.jpg)
Friday, January 29, 2010
djshox's documentary of the majestic Heavy Giraffes
Wonderful preview of some very promising work by djshox.
Saturday, January 23, 2010
New tutorial on custom animation today
I'll be writing up a tutorial today on how to create a basic animation in Maya using the TF2 models provided by valve. It's a really hard tutorial, so it might take awhile to write up, but expect it soon.
Thursday, January 21, 2010
SFM Tools in Portal Experimental Workflow
Changed my mind, djshox already posted a short bit of a early workflow of the process. I haven't tested or anything yet though, so if it doesn't work, don't come crying to me.
Okay so here's the general workflow for SFM working with Portal or hopefully any Source Game (maybe).
1) First, back up your TF2 beta directory somewhere safe.
2) Mystfit and I have only really messed with Portal, but we think you can get just about anything running. You gotta copy the game's content GCF and overwrite everything in the /tf directory EXCEPT for the bin folder. It is important that you leave it unaltered.
3)Rename the Program Files/Team Fortress 2/tf folder to whatever game you're trying to run, like for example I had to change mine to Program Files/Team Fortress 2/portal, EP2 would obviously be Program Files/Team Fortress 2/ep2, etc.
4) Go into the Source Binaries 2007 GCF and extract the vtex_dll.dll to your Program Files/Team Fortress 2/bin folder.
5)Adjust the target of your shortcut to match the game. Instead of
-game tf -tools -console -applaunch 440 -window -noborder -novid
portal would be
applaunch 400 -window -noborder -novid
And that's it. Just a small note, you won't be able to use gestures or voice commands. Heck half the weapon fire effects won't show up, but otherwise there it is.
SFM dlls in Portal - I shit you not!
Mysfit and djshox have been experimenting...no, not like that you sick fuck! They some Portal content to run with the tool .dlls. If i have time tomorrow, i'll see if i can pull a magical tutorial out of my ass, but it's already pretty clogged of a bunch of other shit i have to do tomorrow, so i won't bore you with the...uh...brown details (lol poop jokes)
Still looking for machinima recruits!
If you want to work with me on a machinima, whether it's voice acting, modeling, animation, title screens or body acting (unlikely) Contact me! I always need more help. If you knowledge of domain setup as well it'd be useful for a production/SFM reasource.
Tuesday, January 19, 2010
Custom Maps in SFM (written by me)
Edit: here's a link to the files needing changing: The password is facepunched
After having some extra time after mid-terms today, (which took forever!) I managed to scrap together this tutorial on my own discovery in SFM; how to get custom maps (or in this case, newer updated maps) to work in the TF2 beta. This is not fool-proof, as it has not been tested with anything other then the retail TF2 maps, but i will go under the assumption that it does. That being said, you will need the following:
GCFScape
VTFEdit
Pakrat
A hex editor, like Hex workshop(not free, trial only), Notepad++ (free) with a hex editor plugin or any other program able to edit hex.
Let's get started...
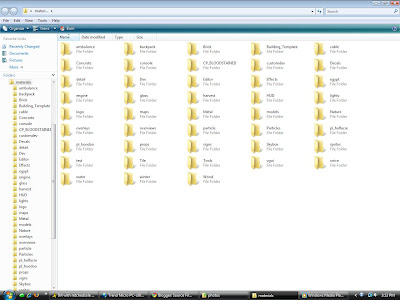
Step 1: Create a folder somewhere and call it TF2 materials backup or something similar. Find the TF2 GCF and open it. Go to tf/materials and click on the materials folder. Right click-extract to the folder created earlier.
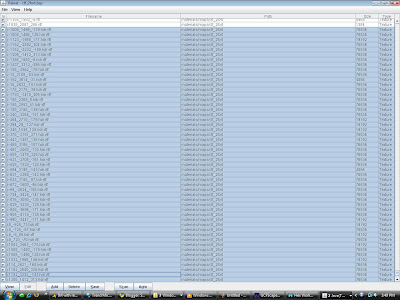
Step 2: This is the long part. Go to the folder you where you just extracted. It should look like this.
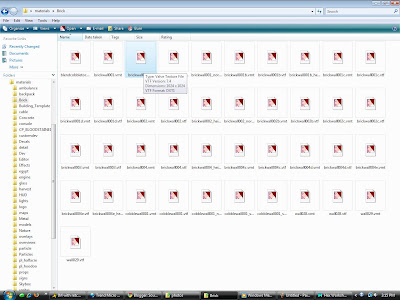
Look for "brickwall001.vtf". This is the first vtf file in this folder. We are going to be changing the vtf version of each vtf file. Drag your mouse over-top of a vtf file. A small window should display info on the file, including the version. (see pic) If it says version 7.1, 7.2 or 7.3, we don't need to change anything. In this case, "brickwall001.vtf" is 7.3, so we can skip it.
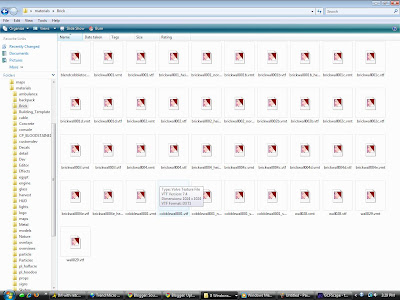
What we want to change is version 7.4. Let's find a file that is version 7.4. Scroll through the vtf's and vmt's until you see "cobblewall001.vtf" Notice how it says version 7.4.
Right click on the version 7.4 file and open it with your hex editor of choice.
Step 3: Hex editors work with bits, which are text code that make up most files, in this groups of 2 numbers.
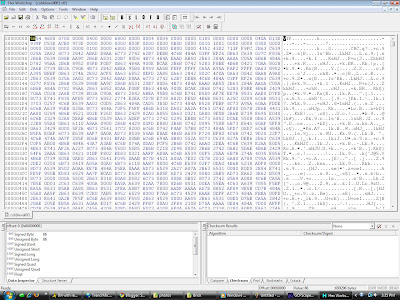
The highlighted text is one byte.
They are labeled as specific offsets (in this program, it's in the bottom left.) displayed in the format "0x00000000". The last digit increases by one for every byte. For example, the first 2 numbers are 0x00000000 and the second 2 number are 0x00000001. Very simple. So, the only thing we need to do is find offset "0x00000008" and highlight it.
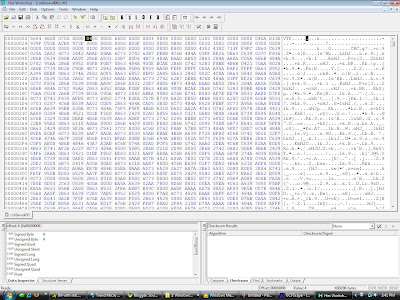
After you've highlighted it, type in "03". The hex should look like this:
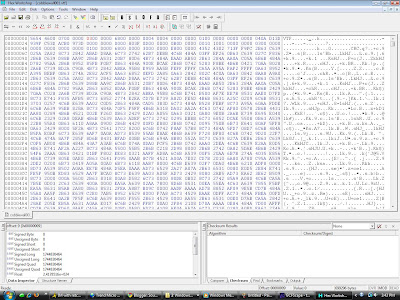
Press save after everything is in order.
Step 4: Repeat steps 2 and 3 for every vtf file. ( you can skip the player models folder unless you want that chnged).
Step 5: Took awhile, eh? Make a new folder in your beta's tf/ folder called material_extract or something similar. Open up pakrat and navigate until you find a vtf file with the letter "hdr" at the end of the filename. Hold down control and select them all.
Then hit save and place them into the folder we created earlier. (Some custom maps will have other materials that may be 7.4, namely TF2 or Garry's mod custom maps. If you load it up in game and you get purple and black checkers, try and see if that's the issue.)
Step 7: Repeat step 3 on the files you just extracted.
Step 8: Temporarily copy and paste all the edited hdr materials (and possibly others) into the normal beta materials folder (only if it's a tf2 map, if not, edit the directory text by hand in Pakrat) In Pakrat, highlight the hdr materials again and make note of the directory structure because you want your edited versions to keep the same structure. Click Add in Pakrat and repeat the control click import process. Once the edited material files are in place, click file-save BSP.
Step 9: Make a backup copy of your TF2 beta materials folder and (if you are replacing) map file. Delete the folders you edited in materials, but not the one's that you didn't by control clicking. Then, copy the edited TF2 GCF materials and map(s) into their respective spots in the TF2 Beta's folder.
Step 10: Load up the beta and test it out! Your sky and/or textures should now all be fixed!
NOTE: this took me about 3 hours to complete for the base TF2 files (this would apply to any other vanilla or unedited source materials). After you do it once, though, each individual map only takes about 15 minutes depending on the amount of textures. This method might not apply for game specific entities or other things not in the beta's code.
Post any questions below. Don't post asking where to get stuff or the beta, as i cannot and will not tell you. If you know how to code, it would be awesome if you could setup batch conversion program for this whole process.
After having some extra time after mid-terms today, (which took forever!) I managed to scrap together this tutorial on my own discovery in SFM; how to get custom maps (or in this case, newer updated maps) to work in the TF2 beta. This is not fool-proof, as it has not been tested with anything other then the retail TF2 maps, but i will go under the assumption that it does. That being said, you will need the following:
GCFScape
VTFEdit
Pakrat
A hex editor, like Hex workshop(not free, trial only), Notepad++ (free) with a hex editor plugin or any other program able to edit hex.
Let's get started...
Step 1: Create a folder somewhere and call it TF2 materials backup or something similar. Find the TF2 GCF and open it. Go to tf/materials and click on the materials folder. Right click-extract to the folder created earlier.
Step 2: This is the long part. Go to the folder you where you just extracted. It should look like this.

Look for "brickwall001.vtf". This is the first vtf file in this folder. We are going to be changing the vtf version of each vtf file. Drag your mouse over-top of a vtf file. A small window should display info on the file, including the version. (see pic) If it says version 7.1, 7.2 or 7.3, we don't need to change anything. In this case, "brickwall001.vtf" is 7.3, so we can skip it.

What we want to change is version 7.4. Let's find a file that is version 7.4. Scroll through the vtf's and vmt's until you see "cobblewall001.vtf" Notice how it says version 7.4.

Right click on the version 7.4 file and open it with your hex editor of choice.
Step 3: Hex editors work with bits, which are text code that make up most files, in this groups of 2 numbers.

The highlighted text is one byte.
They are labeled as specific offsets (in this program, it's in the bottom left.) displayed in the format "0x00000000". The last digit increases by one for every byte. For example, the first 2 numbers are 0x00000000 and the second 2 number are 0x00000001. Very simple. So, the only thing we need to do is find offset "0x00000008" and highlight it.

After you've highlighted it, type in "03". The hex should look like this:

Press save after everything is in order.
Step 4: Repeat steps 2 and 3 for every vtf file. ( you can skip the player models folder unless you want that chnged).
Step 5: Took awhile, eh? Make a new folder in your beta's tf/ folder called material_extract or something similar. Open up pakrat and navigate until you find a vtf file with the letter "hdr" at the end of the filename. Hold down control and select them all.

Then hit save and place them into the folder we created earlier. (Some custom maps will have other materials that may be 7.4, namely TF2 or Garry's mod custom maps. If you load it up in game and you get purple and black checkers, try and see if that's the issue.)
Step 7: Repeat step 3 on the files you just extracted.
Step 8: Temporarily copy and paste all the edited hdr materials (and possibly others) into the normal beta materials folder (only if it's a tf2 map, if not, edit the directory text by hand in Pakrat) In Pakrat, highlight the hdr materials again and make note of the directory structure because you want your edited versions to keep the same structure. Click Add in Pakrat and repeat the control click import process. Once the edited material files are in place, click file-save BSP.
Step 9: Make a backup copy of your TF2 beta materials folder and (if you are replacing) map file. Delete the folders you edited in materials, but not the one's that you didn't by control clicking. Then, copy the edited TF2 GCF materials and map(s) into their respective spots in the TF2 Beta's folder.
Step 10: Load up the beta and test it out! Your sky and/or textures should now all be fixed!
NOTE: this took me about 3 hours to complete for the base TF2 files (this would apply to any other vanilla or unedited source materials). After you do it once, though, each individual map only takes about 15 minutes depending on the amount of textures. This method might not apply for game specific entities or other things not in the beta's code.
Post any questions below. Don't post asking where to get stuff or the beta, as i cannot and will not tell you. If you know how to code, it would be awesome if you could setup batch conversion program for this whole process.
Monday, January 18, 2010
Post your SFM videos here
Post any and all SFM videos here in the comments and i'll add you to the youtube playlist and possibly post your video as quality work on the front page!
Sunday, January 17, 2010
Video by Jojje kicks ass!
One of the first films I'd consider an actual film and not some random test
Saturday, January 16, 2010
Moving Camera Video Tutorial
Panda's at it again! Now with moving cameras!
Text:
Moving Camera Tutorial
Step 1. Record any action the way you normally would.
Step 2. Rightclick on your shot in the sequence timeline and press 'Set new camera'
Step 3. Click on the camera selector (Work Camera/Active camera button) above the viewport.
Step 4. Now we record the path for your camera by moving as you would normally record action. (Sometimes it's recommended that you tick the "Noclip" option before you start the recording).
Step 5. Move about.
Step 6. Press Esc when you're done your camera-ing.
Step 7. Rightclick on the Shot in the timeline. Hit "New Animation Set", and select the camera you used for the recording.
Step 8. Open the Animation Set Editor, and press the red circle.
Step 9. Now you'll see a shit-ton of lines everywhere on your timeline, and a bar around your time-mover-thingy.
Step 10. Drag the right side of bar out (this part is still somewhat confusing to me, I'll have to play around with it some more to figure it out 100%) to the end of your shot.
Step 11. You can add effects like smoothing, jittering, etc. by grabing the sliders:

Step 12. Play around with it for a while, do a lot of test shots before trying anything in a film.
Step 13. Press the Green Arrow to quit the edit-thing mode.
Step 14. Right click on your shot > Zoom in
Step 15. Make sure you're all the way at the beginning of your clip's timeline.
Step 16. Un-tick "Take 1" (or which ever take your camera happened to be) and this will stop your arms from floating around with the camera. (If someone knows how to hide the view model, please tell me)
Step 17. Right click on the clip, and Zoom out.
Now you should have a fairly decent shot to use for your movies. Just be mindful, when you Un-tick the Camera's take, your arms will still be there, at the exact moment in the time line where you un-ticked it. So just make sure your final shots won't be looking the same direction as where you started the clip. (You can see your floating arms through walls too
Friday, January 15, 2010
Tuesday, January 12, 2010
Got SFM Custom Maps WORKING!
I'll have a tutorial up tomorrow. I had a lot of homework and blah blah blah, but i can tell you, it takes a long time and ALOT of patience to setup.
Sunday, January 10, 2010
Fixing those "flaming" textures
Have an issue with your characters igniting randomly during your scenes? Use these helpful vtf files from anothermartz to fix your problem and headache!
"If your characters have a flaming texture on them, go to
\tf\materials\Effects\tiledfire
and put these files in there:
http://dl.dropbox.com/u/99783/Other/...owTiled512.vtf
http://dl.dropbox.com/u/99783/Other/...20Original.vtf
The top file is just a blank texture and the bottom one is the original so you can revert incase you actually want to see a character on fire."
Source Machinima; A brief introduction
Hi, I'm Spwee1494, creator of Accidental Apocalypse Studios. This section which I'll be calling, Source Machinima, will go in-depth into the process, ways and possibilities of Source Machinima. Expect general Cinematography tutorials to face posing, to custom animations with Maya, i'll cover as much as i can as i learn and share everything i know.
If you have anything you'd like to learn yourself, let me know!
If you have anything you'd like to learn yourself, let me know!
SFM Basic Use
*Thanks to TerebyteS*
-How to start SFM:
First of all be sure to have installed all the patches and the tools. Tools go in the bin/tools folder.
Run hl2.exe first. Let it load completely, then exit.
Make a shortcut to hl2.exe. Right click and open the properties. In the target line, go to the end and add:
"-game tf -tools -console -applaunch 440 -window -noborder -novid"
Press OK and use the shortcut to start the game.
You are free to delete RUN_TF2.exe as it is of no use for your purposes.
-How to load a map to work on:
Press:
File -> Load map... Ctrl+L
or use the Ctrl+L key shortcut.
A window will appear at the center of the screen. Select your map from the list at the bottom, click on it and press Open.
Wait for the map to load. Once it's done you'll see the usual TF2 blackboard.
-How to get in position:
First off, you wanna close the welcome board.
To do so, press F10 to change the mode to Game control, and F11 to toggle fullscreen. Select your team and class, and position your character where you'd like to start recording.
If you want to record a swarm of characters, it's useful to position yourself behind a wall, where the camera can't see you, as that will serve as a start point for every instance you're going to record of yourself.
After you're in the right position, press F10 and F11 again in order to go back to the editing window.
-How to record a track
To record a track, press the record button (Red circle), edit the settings to your liking and press Record.
You will hear four beeping sounds. The last one will tell you when the recording will start.
Record your action, and when you're done press Esc to go back to editing mode.
The recording will stop by itself.
Now you can scrub trough the recorded track and cut the parts you don't like.
-How to record the later tracks.
After you recorded the first track, you may want to take another character and start acting with it. Press F10 and F11 again to get in Game Mode, and change your class or your team.
While you explore the map you'll notice ammo packs and cap points are doubled, and one of them is rotating, while the other is standing still. Since you don't want this bad effect to appear in your final track, you may want to delete the entities.
For ammo packs and health packs, just put your crossair over them and, in console, type:
"ent_remove"
and press Enter. The rotating entity will disappear, and the copy from the old recording will remain. You'll have to repeat this for every recording.
You can't use ent_remove on Capture Points, because the game would crash.
Point your crossair at the hologram (preferably the top) and type in console:
"ent_fire !picker hidemodel"
The CP should vanish. If it reappears in the next recordings, just repeat.
To make multiple instances of yourself, just repeat the above steps.
Once you're done with the instances, follow the below steps.
-How to place a camera
To place a camera, move your mouse over the track in the timeline, right click and select Set New Camera. Now, with no need for F10 and F11, just use your wasd keys and your mouse (click and drag on the view window) to move the camera and place it in a convenient position.
-Watch your result
Now press the Play button and watch the final result till the end. You'll probably want to cut out a piece at the end. To do so, position your mouse at the end of the clip and it should take a "]" shape. Click and drag to the desired endpoint of the track.
-Watch your result
To render a video, press File and Export video. Save it if prompted, then change the folder where it will save the video and make a folder just for it. Then you can select if to save .tgas (it's better) or .avi. If you save tgas you can put them together using vdub.
NEW:
Adjust camera focal distance
Adjust the focal distance on the Work Camera by pressing F and moving the mouse up and down. Simple as that!
thrawn2787's Multiple Camera Tutorial
Another helpful community member. If he updates anything else, ill edit this page.
SFM FAQ
Post your questions as comments or e-mail me. I might be using bits of "TerabyteS's" post to start it off.
Configuring Source Filmmaker
The Source Filmmaker was never officially released by Valve. They have stated they would release the tools (among other things) but i assumed it would never happen. After being tired of waiting, I went on a hunt. I discovered that the tools were accidentally leaked by Valve in the first week of release of the Team Fortress 2 beta between 09-17-07 and 09-26-07. It was during this period of time that the SFM tools were available to the public (or maybe, were for the public, but Valve changed their minds due to glitches or other obligations). At any rate, these tools no longer function (at their current state) with the most recent version of Team Fortress 2.
The solution? Acquire the TF2 Beta between the dates of 09-17-07 and 09-26-07, make it function as a standalone program without steam and add the tools (if needed) to the bin\tools directory. How do you know if you have the tools? Here are all of the required files to make it work;
bin\tools\
actbusy.dll
commedit.dll
foundry.dll
ifm.dll
pet.dll
sampletool.dll
vcdblock.dll
vmt.dll
bin\
p4lib.dll
enginetools.txt
If you do not have these tools, never fret! They are still able to be acquired! http://www.hl2world.com/bbs/2-vt48251.html?postdays=0&postorder=asc&start=15 Scroll until you find a post by "blants" posting an external link and brief explanation, those are the files you are looking for!
Let's say you don't still have the TF2 Beta .gcf/files backed-up somewhere on your computer. Then what do you do? Sadly, if i told you, Valve would send many powerful, scary men to bust down my door and break my legs. Getting the beta is your own issue. I can, however, tell you how to make your files steam standalone, if they aren't already.
If anyone actually got this far, (you brave, brave souls!) there's one more crucial step. Find your beta's directory folder and find hl2.exe (Half-Life 2.exe for you dip-shits). Right click the exe file and click send to -> desktop (create shortcut). This will create a shortcut to TF2 Beta that we can set specific launch properties. First, right click the shortcut and look where it says "target" followed by an editable text box. After the already present text, add:
"-game tf -applaunch 440" without " and "
Now, launch the game at least one time, load up any old map, then close the beta. Right click the shortcut again. This time, add:
"-window -noborder -novid -tools" again without " and "
Once these parameters are added to the shortcut, you should end up with a screen something like this:

If a dialog box pops up with a bunch of coding and .dll gibberish when loading the beta or loading a map, just click ok, it has no effect on the program or gameplay. After that, you're done! Make some movies, takes some screenshots and pass anything new you learn onto your peers here or on facepunch.
Any other problems, e-mail me, leave a comment or go to the facepunch thread to ask or look for someone else who already (and probably has) had your problem. I plan on adding an FAQ page and pictures to this tutorial at a later date. Please DO NOT e-mail me or anyone else about how to get the beta, as it annoying and considered illegal to tell you. Thanks for reading and i hope it works for you =]
The solution? Acquire the TF2 Beta between the dates of 09-17-07 and 09-26-07, make it function as a standalone program without steam and add the tools (if needed) to the bin\tools directory. How do you know if you have the tools? Here are all of the required files to make it work;
bin\tools\
actbusy.dll
commedit.dll
foundry.dll
ifm.dll
pet.dll
sampletool.dll
vcdblock.dll
vmt.dll
bin\
p4lib.dll
enginetools.txt
If you do not have these tools, never fret! They are still able to be acquired! http://www.hl2world.com/bbs/2-vt48251.html?postdays=0&postorder=asc&start=15 Scroll until you find a post by "blants" posting an external link and brief explanation, those are the files you are looking for!
Let's say you don't still have the TF2 Beta .gcf/files backed-up somewhere on your computer. Then what do you do? Sadly, if i told you, Valve would send many powerful, scary men to bust down my door and break my legs. Getting the beta is your own issue. I can, however, tell you how to make your files steam standalone, if they aren't already.
If anyone actually got this far, (you brave, brave souls!) there's one more crucial step. Find your beta's directory folder and find hl2.exe (Half-Life 2.exe for you dip-shits). Right click the exe file and click send to -> desktop (create shortcut). This will create a shortcut to TF2 Beta that we can set specific launch properties. First, right click the shortcut and look where it says "target" followed by an editable text box. After the already present text, add:
"-game tf -applaunch 440" without " and "
Now, launch the game at least one time, load up any old map, then close the beta. Right click the shortcut again. This time, add:
"-window -noborder -novid -tools" again without " and "
Once these parameters are added to the shortcut, you should end up with a screen something like this:
If a dialog box pops up with a bunch of coding and .dll gibberish when loading the beta or loading a map, just click ok, it has no effect on the program or gameplay. After that, you're done! Make some movies, takes some screenshots and pass anything new you learn onto your peers here or on facepunch.
Any other problems, e-mail me, leave a comment or go to the facepunch thread to ask or look for someone else who already (and probably has) had your problem. I plan on adding an FAQ page and pictures to this tutorial at a later date. Please DO NOT e-mail me or anyone else about how to get the beta, as it annoying and considered illegal to tell you. Thanks for reading and i hope it works for you =]
Video Tutorials by Pandamobile
The first I really revealed the setup of Source Filmmaker to was Pandamobile. He was someone I had never met before, but after talking to him, i could tell he was a trustworthy individual and an aspiring filmmaker. Almost 2 days after explaining how to work the tools, he completed a short video tutorial for the program's features. This is the page where I will archive his guides (assuming he makes more than 2).
Tutorial 1; Recording a scene
Tutorial 2; Animation Editor
Tutorial 1; Recording a scene
Tutorial 2; Animation Editor
Welcome to SFM Blog!
On this page, i will explain how to setup Valve's source filmmaker tools leftover in the beta, tricks you can perform with the tool and how to fix technical problems with the program. I will also periodically post my own films (Accidental Apocalypse Studios) or other SFM related works. If you have any tips or things you'd like posted here, e-mail me.
Subscribe to:
Comments (Atom)