.jpg)
Friday, January 29, 2010
djshox's documentary of the majestic Heavy Giraffes
Wonderful preview of some very promising work by djshox.
Saturday, January 23, 2010
New tutorial on custom animation today
I'll be writing up a tutorial today on how to create a basic animation in Maya using the TF2 models provided by valve. It's a really hard tutorial, so it might take awhile to write up, but expect it soon.
Thursday, January 21, 2010
SFM Tools in Portal Experimental Workflow
Changed my mind, djshox already posted a short bit of a early workflow of the process. I haven't tested or anything yet though, so if it doesn't work, don't come crying to me.
Okay so here's the general workflow for SFM working with Portal or hopefully any Source Game (maybe).
1) First, back up your TF2 beta directory somewhere safe.
2) Mystfit and I have only really messed with Portal, but we think you can get just about anything running. You gotta copy the game's content GCF and overwrite everything in the /tf directory EXCEPT for the bin folder. It is important that you leave it unaltered.
3)Rename the Program Files/Team Fortress 2/tf folder to whatever game you're trying to run, like for example I had to change mine to Program Files/Team Fortress 2/portal, EP2 would obviously be Program Files/Team Fortress 2/ep2, etc.
4) Go into the Source Binaries 2007 GCF and extract the vtex_dll.dll to your Program Files/Team Fortress 2/bin folder.
5)Adjust the target of your shortcut to match the game. Instead of
-game tf -tools -console -applaunch 440 -window -noborder -novid
portal would be
applaunch 400 -window -noborder -novid
And that's it. Just a small note, you won't be able to use gestures or voice commands. Heck half the weapon fire effects won't show up, but otherwise there it is.
SFM dlls in Portal - I shit you not!
Mysfit and djshox have been experimenting...no, not like that you sick fuck! They some Portal content to run with the tool .dlls. If i have time tomorrow, i'll see if i can pull a magical tutorial out of my ass, but it's already pretty clogged of a bunch of other shit i have to do tomorrow, so i won't bore you with the...uh...brown details (lol poop jokes)
Still looking for machinima recruits!
If you want to work with me on a machinima, whether it's voice acting, modeling, animation, title screens or body acting (unlikely) Contact me! I always need more help. If you knowledge of domain setup as well it'd be useful for a production/SFM reasource.
Tuesday, January 19, 2010
Custom Maps in SFM (written by me)
Edit: here's a link to the files needing changing: The password is facepunched
After having some extra time after mid-terms today, (which took forever!) I managed to scrap together this tutorial on my own discovery in SFM; how to get custom maps (or in this case, newer updated maps) to work in the TF2 beta. This is not fool-proof, as it has not been tested with anything other then the retail TF2 maps, but i will go under the assumption that it does. That being said, you will need the following:
GCFScape
VTFEdit
Pakrat
A hex editor, like Hex workshop(not free, trial only), Notepad++ (free) with a hex editor plugin or any other program able to edit hex.
Let's get started...
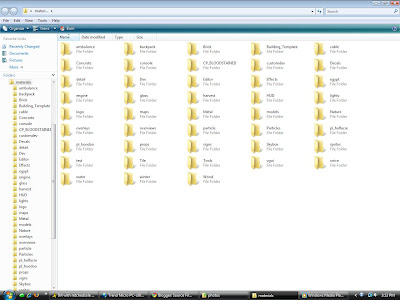
Step 1: Create a folder somewhere and call it TF2 materials backup or something similar. Find the TF2 GCF and open it. Go to tf/materials and click on the materials folder. Right click-extract to the folder created earlier.
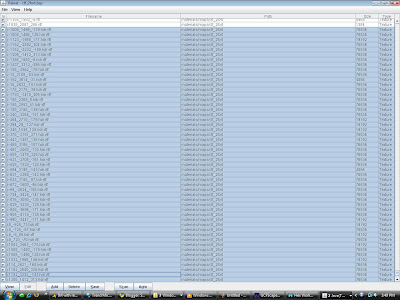
Step 2: This is the long part. Go to the folder you where you just extracted. It should look like this.
Look for "brickwall001.vtf". This is the first vtf file in this folder. We are going to be changing the vtf version of each vtf file. Drag your mouse over-top of a vtf file. A small window should display info on the file, including the version. (see pic) If it says version 7.1, 7.2 or 7.3, we don't need to change anything. In this case, "brickwall001.vtf" is 7.3, so we can skip it.
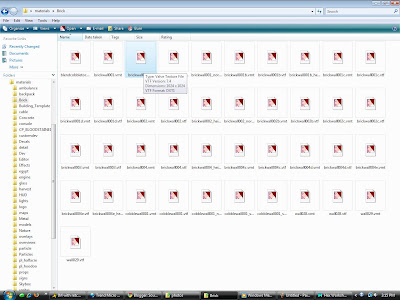
What we want to change is version 7.4. Let's find a file that is version 7.4. Scroll through the vtf's and vmt's until you see "cobblewall001.vtf" Notice how it says version 7.4.
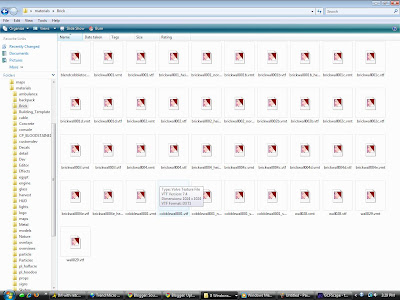
Right click on the version 7.4 file and open it with your hex editor of choice.
Step 3: Hex editors work with bits, which are text code that make up most files, in this groups of 2 numbers.
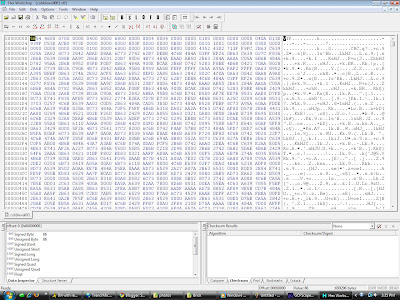
The highlighted text is one byte.
They are labeled as specific offsets (in this program, it's in the bottom left.) displayed in the format "0x00000000". The last digit increases by one for every byte. For example, the first 2 numbers are 0x00000000 and the second 2 number are 0x00000001. Very simple. So, the only thing we need to do is find offset "0x00000008" and highlight it.
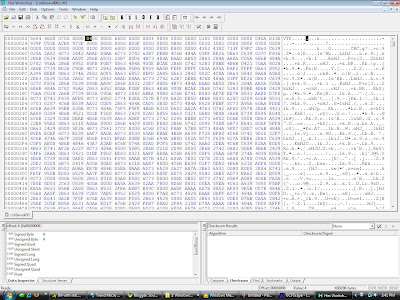
After you've highlighted it, type in "03". The hex should look like this:
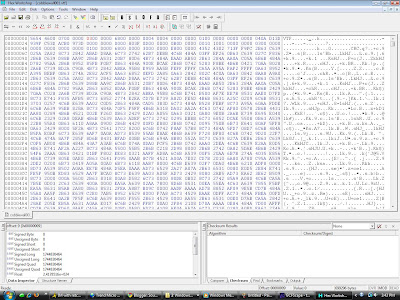
Press save after everything is in order.
Step 4: Repeat steps 2 and 3 for every vtf file. ( you can skip the player models folder unless you want that chnged).
Step 5: Took awhile, eh? Make a new folder in your beta's tf/ folder called material_extract or something similar. Open up pakrat and navigate until you find a vtf file with the letter "hdr" at the end of the filename. Hold down control and select them all.
Then hit save and place them into the folder we created earlier. (Some custom maps will have other materials that may be 7.4, namely TF2 or Garry's mod custom maps. If you load it up in game and you get purple and black checkers, try and see if that's the issue.)
Step 7: Repeat step 3 on the files you just extracted.
Step 8: Temporarily copy and paste all the edited hdr materials (and possibly others) into the normal beta materials folder (only if it's a tf2 map, if not, edit the directory text by hand in Pakrat) In Pakrat, highlight the hdr materials again and make note of the directory structure because you want your edited versions to keep the same structure. Click Add in Pakrat and repeat the control click import process. Once the edited material files are in place, click file-save BSP.
Step 9: Make a backup copy of your TF2 beta materials folder and (if you are replacing) map file. Delete the folders you edited in materials, but not the one's that you didn't by control clicking. Then, copy the edited TF2 GCF materials and map(s) into their respective spots in the TF2 Beta's folder.
Step 10: Load up the beta and test it out! Your sky and/or textures should now all be fixed!
NOTE: this took me about 3 hours to complete for the base TF2 files (this would apply to any other vanilla or unedited source materials). After you do it once, though, each individual map only takes about 15 minutes depending on the amount of textures. This method might not apply for game specific entities or other things not in the beta's code.
Post any questions below. Don't post asking where to get stuff or the beta, as i cannot and will not tell you. If you know how to code, it would be awesome if you could setup batch conversion program for this whole process.
After having some extra time after mid-terms today, (which took forever!) I managed to scrap together this tutorial on my own discovery in SFM; how to get custom maps (or in this case, newer updated maps) to work in the TF2 beta. This is not fool-proof, as it has not been tested with anything other then the retail TF2 maps, but i will go under the assumption that it does. That being said, you will need the following:
GCFScape
VTFEdit
Pakrat
A hex editor, like Hex workshop(not free, trial only), Notepad++ (free) with a hex editor plugin or any other program able to edit hex.
Let's get started...
Step 1: Create a folder somewhere and call it TF2 materials backup or something similar. Find the TF2 GCF and open it. Go to tf/materials and click on the materials folder. Right click-extract to the folder created earlier.
Step 2: This is the long part. Go to the folder you where you just extracted. It should look like this.

Look for "brickwall001.vtf". This is the first vtf file in this folder. We are going to be changing the vtf version of each vtf file. Drag your mouse over-top of a vtf file. A small window should display info on the file, including the version. (see pic) If it says version 7.1, 7.2 or 7.3, we don't need to change anything. In this case, "brickwall001.vtf" is 7.3, so we can skip it.

What we want to change is version 7.4. Let's find a file that is version 7.4. Scroll through the vtf's and vmt's until you see "cobblewall001.vtf" Notice how it says version 7.4.

Right click on the version 7.4 file and open it with your hex editor of choice.
Step 3: Hex editors work with bits, which are text code that make up most files, in this groups of 2 numbers.

The highlighted text is one byte.
They are labeled as specific offsets (in this program, it's in the bottom left.) displayed in the format "0x00000000". The last digit increases by one for every byte. For example, the first 2 numbers are 0x00000000 and the second 2 number are 0x00000001. Very simple. So, the only thing we need to do is find offset "0x00000008" and highlight it.

After you've highlighted it, type in "03". The hex should look like this:

Press save after everything is in order.
Step 4: Repeat steps 2 and 3 for every vtf file. ( you can skip the player models folder unless you want that chnged).
Step 5: Took awhile, eh? Make a new folder in your beta's tf/ folder called material_extract or something similar. Open up pakrat and navigate until you find a vtf file with the letter "hdr" at the end of the filename. Hold down control and select them all.

Then hit save and place them into the folder we created earlier. (Some custom maps will have other materials that may be 7.4, namely TF2 or Garry's mod custom maps. If you load it up in game and you get purple and black checkers, try and see if that's the issue.)
Step 7: Repeat step 3 on the files you just extracted.
Step 8: Temporarily copy and paste all the edited hdr materials (and possibly others) into the normal beta materials folder (only if it's a tf2 map, if not, edit the directory text by hand in Pakrat) In Pakrat, highlight the hdr materials again and make note of the directory structure because you want your edited versions to keep the same structure. Click Add in Pakrat and repeat the control click import process. Once the edited material files are in place, click file-save BSP.
Step 9: Make a backup copy of your TF2 beta materials folder and (if you are replacing) map file. Delete the folders you edited in materials, but not the one's that you didn't by control clicking. Then, copy the edited TF2 GCF materials and map(s) into their respective spots in the TF2 Beta's folder.
Step 10: Load up the beta and test it out! Your sky and/or textures should now all be fixed!
NOTE: this took me about 3 hours to complete for the base TF2 files (this would apply to any other vanilla or unedited source materials). After you do it once, though, each individual map only takes about 15 minutes depending on the amount of textures. This method might not apply for game specific entities or other things not in the beta's code.
Post any questions below. Don't post asking where to get stuff or the beta, as i cannot and will not tell you. If you know how to code, it would be awesome if you could setup batch conversion program for this whole process.
Monday, January 18, 2010
Post your SFM videos here
Post any and all SFM videos here in the comments and i'll add you to the youtube playlist and possibly post your video as quality work on the front page!
Subscribe to:
Posts (Atom)